Video ads on Facebook are an excellent way to reach your target audience and get them aware of, interested in, or ready to buy from your business. While using video ads on Facebook isn’t new by any stretch of the imagination, many of the bells and whistles that come with it are.
Let’s go through everything you need to know about Facebook video ads!
Contents
- What are Facebook video ads?
- Why run Facebook video ads?
- Creating Facebook video ads: What to know before you start
- How to create Facebook video ads
- How to preview your Facebook video ads
- How to measure your Facebook video ad performance
- Facebook video ad tips and best practices
What Facebook video ads are and how they’re different from other Meta ad formats
The first thing you need to understand about video on Facebook is that, while “Facebook video ad” sounds like a specific format, it’s actually not. In reality, you can use video in nearly all ad formats available on the Meta Ads network.
There are really only three different versions of ads on Facebook: single image or video, carousels, and collections.
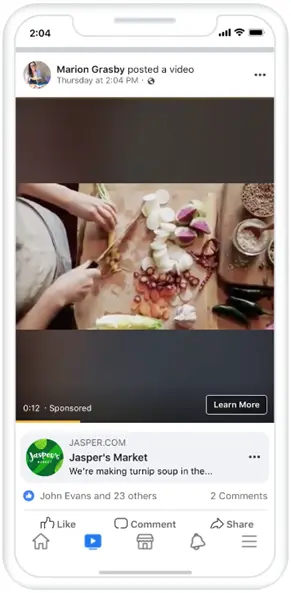
With a single creative (known as a single image ad, or single video ad), you, as the advertiser, would choose just one creative, add in your supporting text, any add-ons, and then your ads would look something like what you see above. Only one video (in this case) would be visible, hence the name “single video ad.”
With a carousel ad, you can have up to 10 “cards” that all contain their own creative and supporting text. Users can then swipe through them and engage with the ad unit as a whole or the individual cards within the ads.
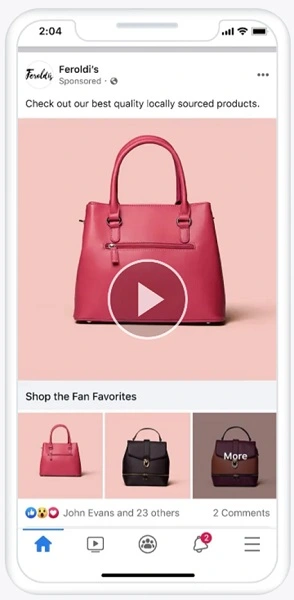
Collection ads are effectively product feeds that highlight items in your catalog, but they can be accompanied by a video creative as well.
🎦 Could your Meta account benefit from more video ads? Find out with a free, instant account grade using our Facebook Ads Grader!
Why run Facebook video ads instead of images?
While every account on Facebook will perform differently depending on the industry, target audience, and ending creative, there are some regularly shared benefits of using video in ads rather than static images:
- Stops the scroll: A video is a dynamic feature with sounds and movement that can be attractive while someone is scrolling on their device, ideally making them stop and watch at least a short amount of the video before moving on. Static images can also do this depending on their design, but by its nature, video has a better chance to grab attention.
- Complex storytelling: Videos allow you to tell a much more complex story about your brand, product, services, customers, etc. than a single image could possibly convey.
- Engagement and awareness: Videos often drive much more engagement on Facebook, likely because they can house so much more complexity than single images. This includes driving brand awareness from people watching the first few seconds of your video, more engagement from longer watch times, but also, in my experience, these tend to have higher comment, reaction, and share rates as well.
- Remarketing capabilities: Due to these increased interactions, it’s typically easier to build remarketing lists based on these video users more quickly, but there are also a few more levers you can pull to combine audiences in Facebook. We’ll get to that a little later on.
Those certainly aren’t all the benefits of video ads, but you can understand why they could be valuable compared to other ad formats.
Creating Facebook video ads: What to know before you start
Now let’s get into the tactical steps of using video in your Facebook Ads. As I mentioned earlier, you can use videos in all available ad formats, but for the most part, the process of creating a new ad is the same regardless of format. So for now, I’m going to walk through ad creation for a single video ad to show you how it’s done, let you know what to expect in the setup process, and discuss some more advanced levers you may want to pull in your account.
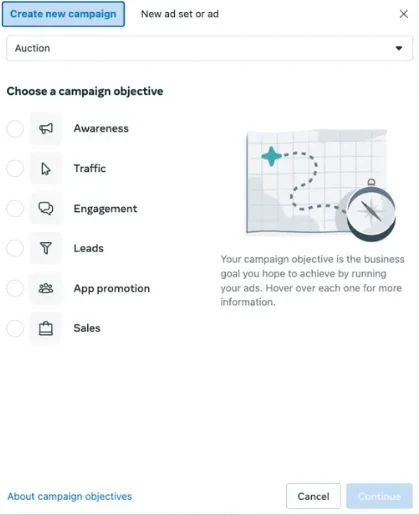
Facebook video ad campaign objectives
The first step in creating a new campaign on Facebook is to choose your campaign objective.
Luckily for any of you planning on testing video, every single one of these campaign objectives can support video ads in addition to images.
What to use for video sources
Skipping a few steps in the process (all ad set settings are also compatible with video ads), the next step is to get the video you want to use for your ad into the Facebook platform. This can be done in a few different ways.
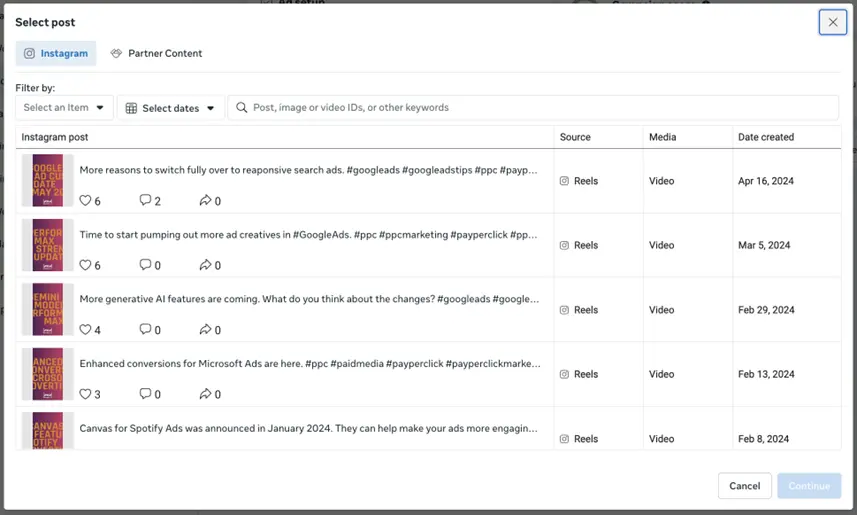
When you create a new ad on Facebook, you can choose to create a new ad from scratch, use an existing post, or use a mockup you made in Creative Hub.

We’re going to skip creating an ad for now. That’ll be our more in-depth walk-through.
Using an existing post lets you review the posts on the Facebook or Instagram accounts of the business you’re advertising and use those posts directly as the creative. That leverages the images, videos, and surrounding text that are used for the organic post, and you’re not able to adjust those or adjust the destination.
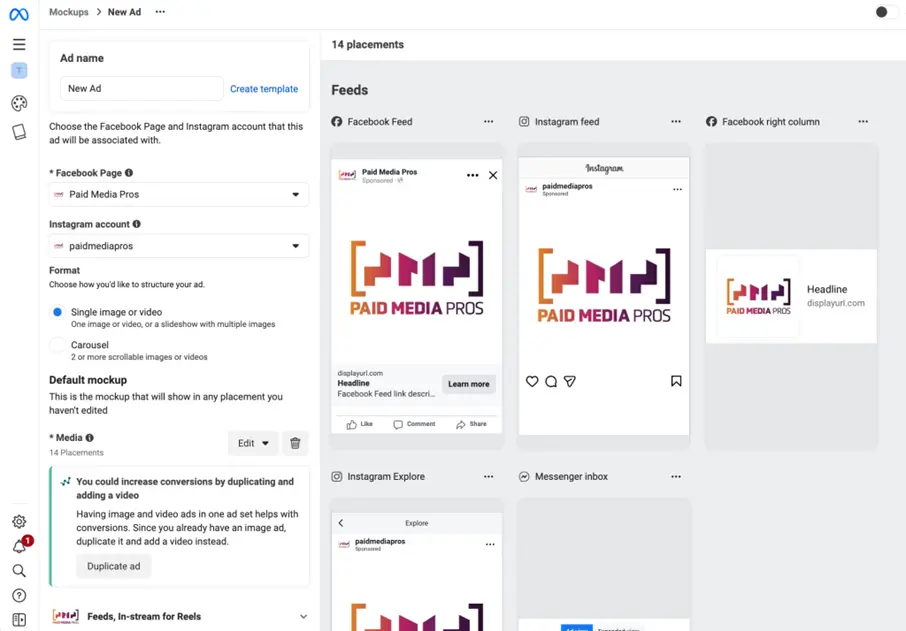
Using a Creative Hub mockup lets you pull in any creatives you made in Facebook’s Creative Hub and leverage those as your creatives. The process of building an ad in Creative Hub is very similar to the process we’ll go through shortly for creating a new ad, but you can see the previews much more easily, and you can work on lots of creative variants without having to add them into a campaign structure.
How to create a Facebook video ad from scratch
Now, let’s get into the ad creation process itself by creating an ad from scratch. This is where we’ll cover quite a bit of the information about video ads that you’ll need to know.
You’ll first be prompted to select whether you want to use a single video, carousel, or collection. For this post, we’re sticking with a single video ad to keep things simple.
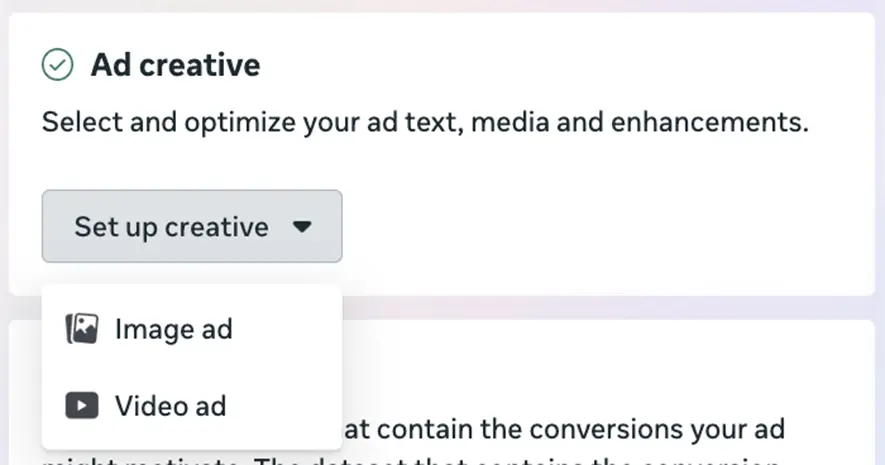
Next, you’ll need to designate the ad creative as a video ad in the dropdown.
Then you’ll immediately be prompted to choose the video you want to use in your creative. As you can see from the top bar, this can come from many different sources.

First, you can upload a video directly in this interface by clicking “account,” then selecting +upload in the upper right of the screen.

Here’s Facebook’s design recommendations for video ads:
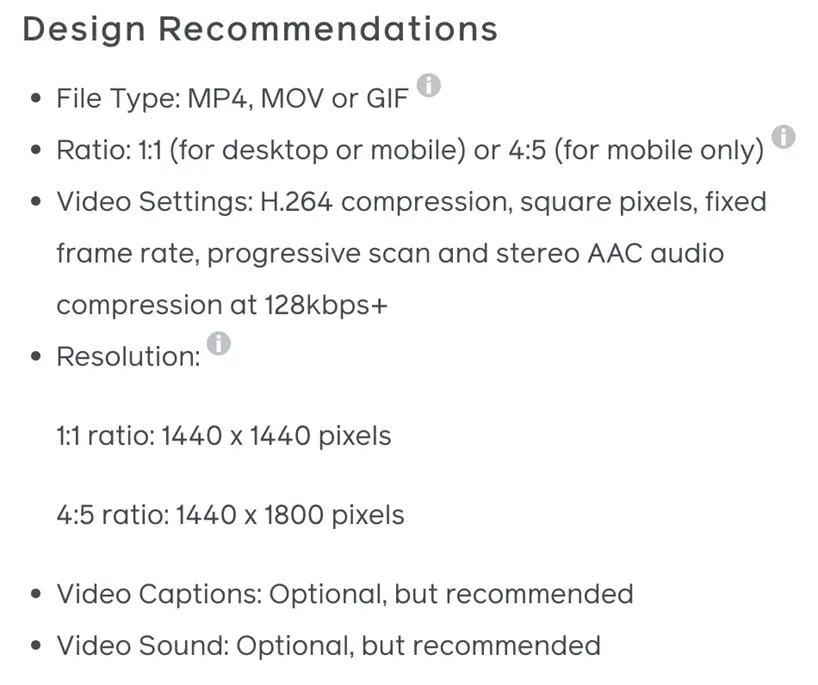
You can choose whichever file type works best for you, and you can see that Facebook recommends two different ratios. In my opinion, this is the minimum you should have in place. There’s a third ratio that most advertisers will benefit from having, but we’ll talk about that in the customization portion. Otherwise, you can see they recommend, but don’t require captions or sound.
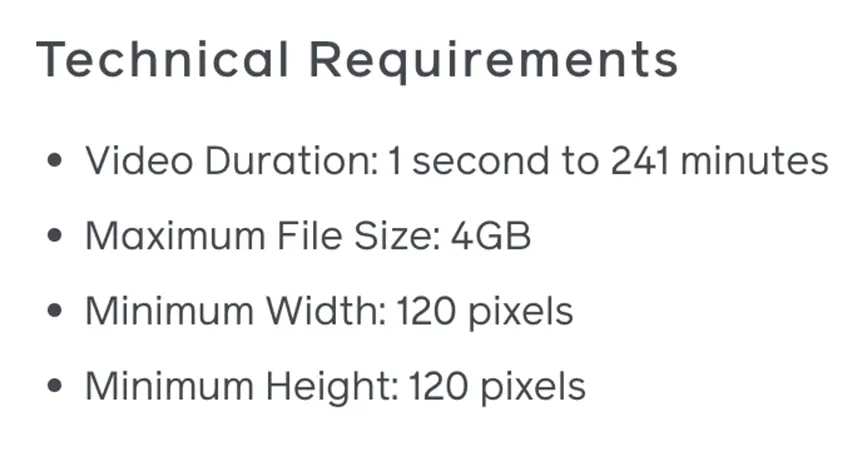
Next are the technical requirements. These, unlike design recommendations, are not optional. All videos must comply with these settings, or Facebook won’t allow you to upload them.
Once you’ve uploaded your video, you’ll be walked through a few different steps on how to make the video more appealing as part of the Meta Ads network.
(As a side note: many of the accounts I work on have different setup flows, so this might not be the exact same order you see, but all the same features are possible when creating a new ad.)
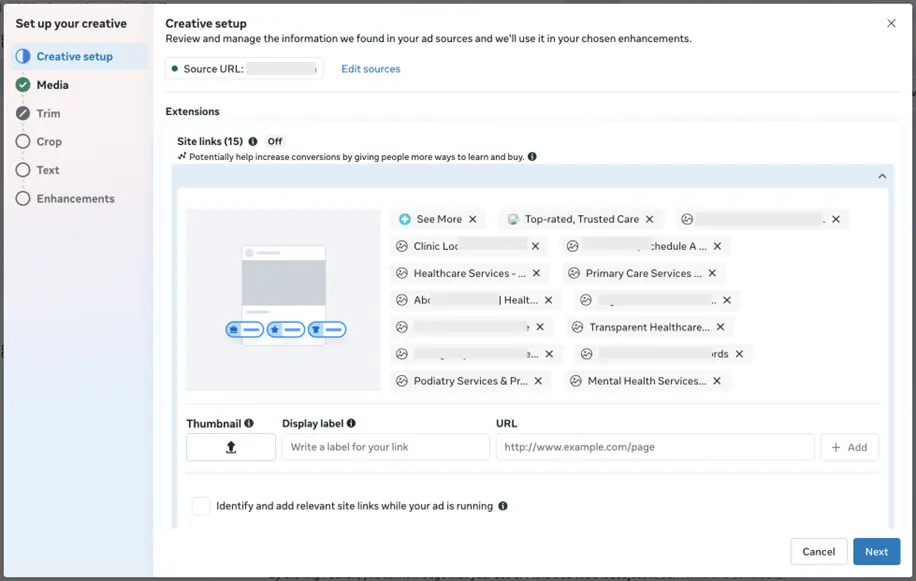
First, you’re prompted to choose any site links you want to run alongside your ad. These are found on your website but can be customized with text, images, and final URLs just like sitelinks on Google.
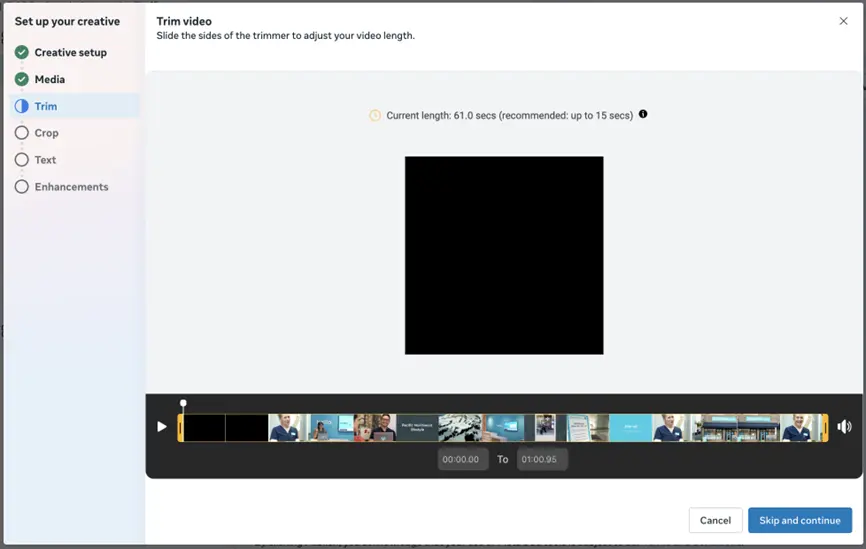
Next, Facebook starts showing off some of its video editing features. From directly in the builder, you can shorten your video creative to just the most impactful part by either trimming the front or end of the video.
That might seem pretty cool, but for my money, the best option we have on Facebook is on the next tab: Crop.
On this page, we can not only choose to crop a video to fit into a specific ad placement orientation, but we can actually replace the existing video with a video that fills that space. All you have to do is click replace under the ad side you want to customize, then upload a new video with the new aspect ratio, and you’re off to the races. You don’t have to have multiple ad units to leverage your differently sized ads.
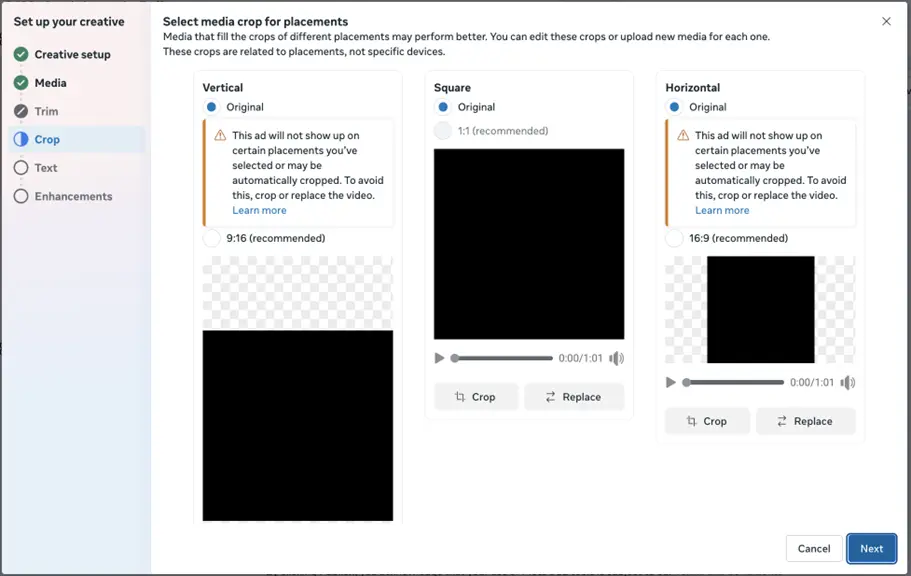
The design recommendations earlier highlighted the 1:1 and 4:5 ratios, but in the image above, you can also see a 16:9 horizontal aspect ratio that will show in many places around the network.
I encourage all of my clients to create the same ad in all three ratios for us to leverage the creative in all placements across the networks whenever possible because, in my experience, those tend to look better. But if push comes to shove, you can use these integrated tools to build video ads that will fill the spaces across all placements.
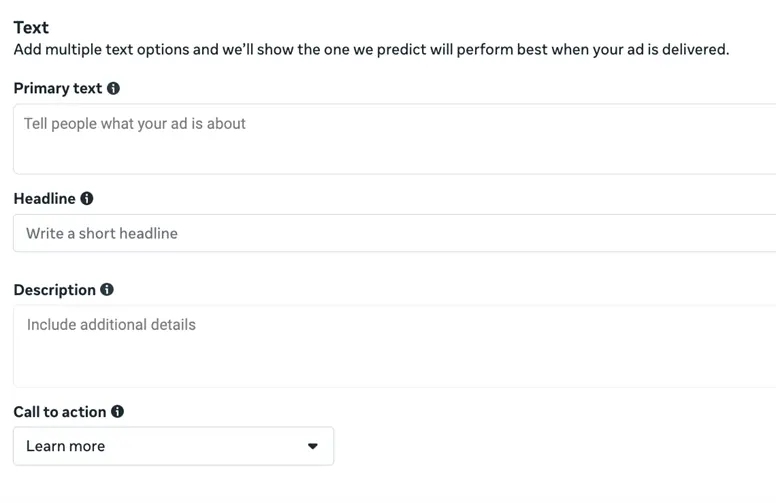
The next option is simply the text around your video ads. Depending on the ad format you’re using and the placements you’re leveraging, different combinations of these can be leveraged.
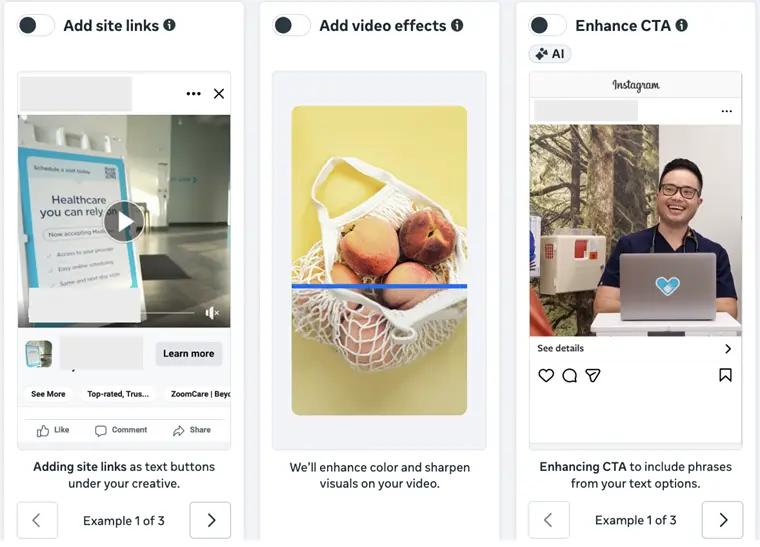
The last step in the setup process is video enhancements. There are six of these, and they each do something slightly different:
- Site links: These are short snippets of text and images that can have their own landing pages, just like in Google Ads.
- Video effects: This allows Facebook to enhance the color or sharpen the visuals in the video you upload. This can be a helpful feature that can help your ads pop against the regular newsfeed.
- Enhance CTA: Facebook will adjust your call to action to include text from your supplied headlines, descriptions, and intro text fields when it thinks they can help your ads perform better.
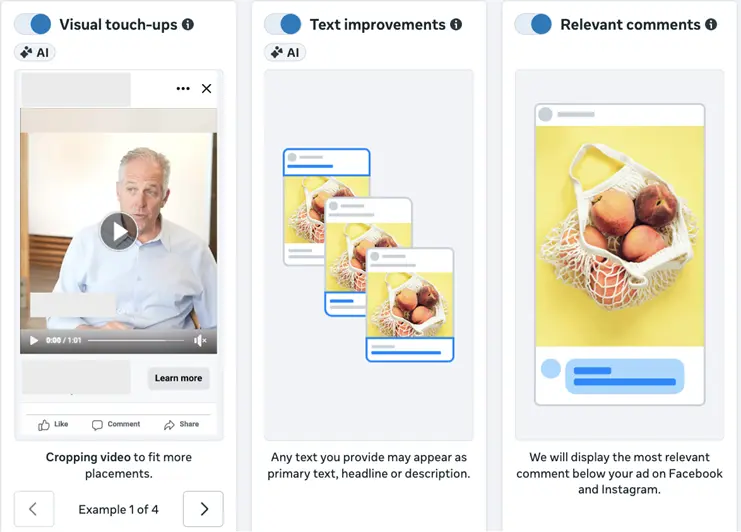
- Visual touchups: This lets Facebook crop your video to fit into more placements. While this can be a good feature if your ads are just a touch off the right aspect ratio, I’d always encourage you to develop your ads to fit each placement and not rely on Facebook’s AI to do it for you.
- Text improvements: This gives Facebook the ability to leverage all of the text components you provided in any combination, not just keeping them limited to the headlines, descriptions, and intro text fields you added them to.
- Relevant comments: This one is pretty simple, but it gives Facebook the control to display what it believes is the most relevant comment below your ads.
You can choose any combination of activating or deactivating these six enhancements before your ad goes live.
How to preview your Facebook video ads
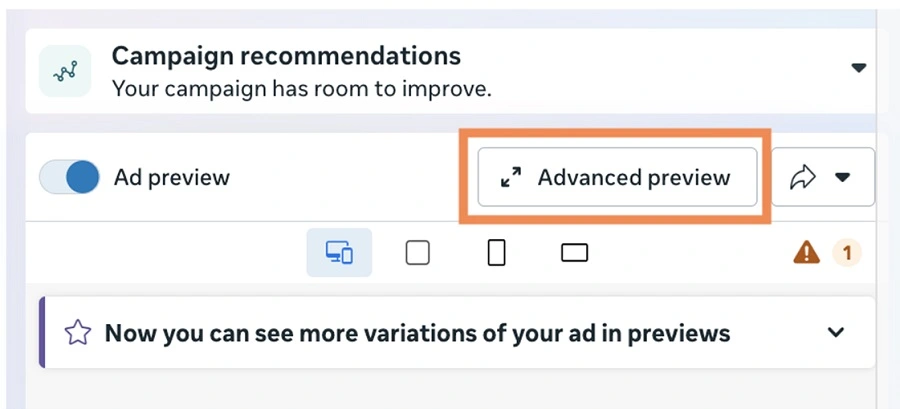
Before any of your ads go live, I encourage you to review how they look in each placement they’ll be live on. By default, Facebook will show you one or two previews of your ads in the builder, but it’s important to make sure your ads look good in all placements across the network.
This is pretty simple and can be done by clicking advanced preview in the upper right of the campaign manager.
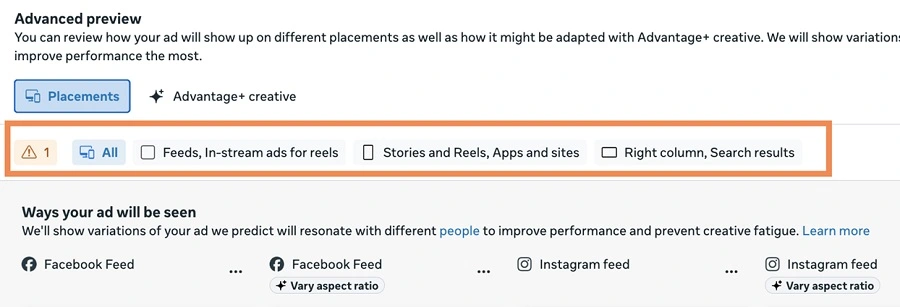
From that screen, you can scroll to see all of the placements your video ads can run and how they’ll appear. You can also filter for only a certain set of placements that will all have similar looks and feels, so you can see them all together.
How to measure your Facebook video ad performance
Once you’ve finished customizing your ads and you have them published, there are tons of performance metrics you can review for them.
In the Meta Ads campaign manager, you can adjust the visible performance columns to your heart’s content. If you click on columns, you can see the ability to customize your list, but you can also view the presets Facebook has available.
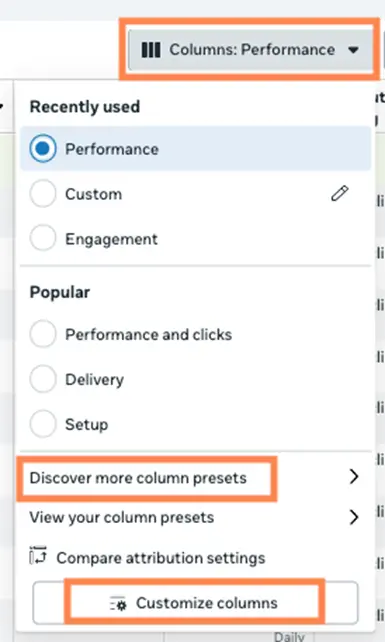
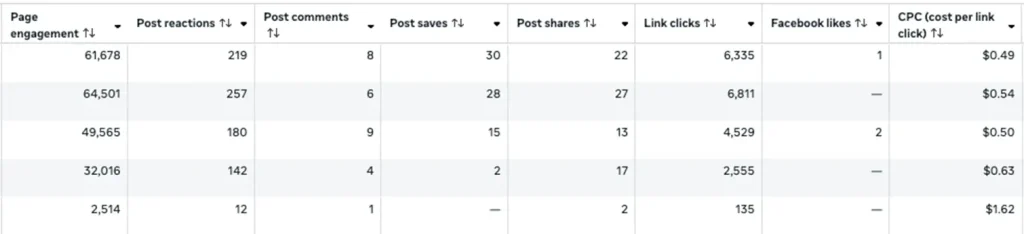
One of them is for video engagement that will populate the columns below:
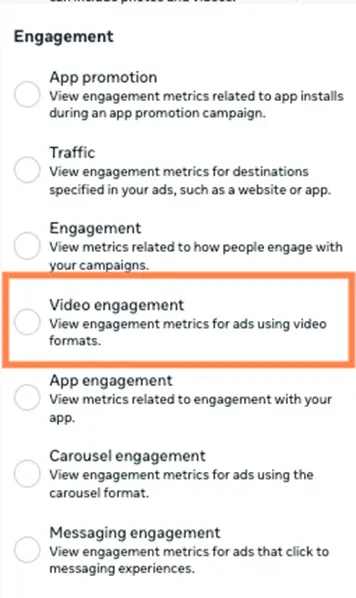
Here you can see how your videos drove page and post engagement, as well as clicks to your site and the price of those clicks. But just about any metric available in the Facebook interface can be combined with video ads, including conversions, ROI, and more.
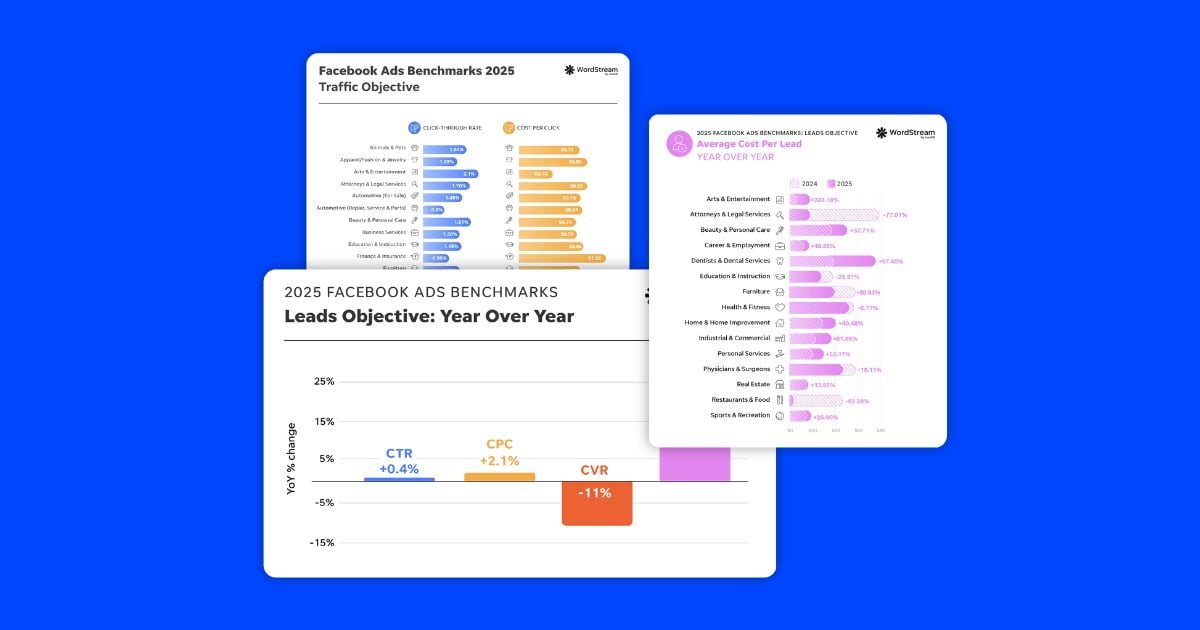
 Are your Facebook video ads outperforming the competition? Compare your data to averages in your industry for key Facebook metrics with our free Facebook Ads benchmarks report!
5 best practices for Facebook video ads
Now that we have the fundamentals of Facebook video ads finished, let’s cover some best practices that you can use to make sure you get the most from your video ads.
1. Front-load your video with a hook and branding
Odds are, you’re someone who has been on a social media platform before. Because of that, you know how easy it is to stop scrolling on a video, watch a few seconds, then move on. There are no stakes involved in skipping a video, but you usually see at least a couple of seconds of it, if not more.
From a marketing perspective, the best thing you can do is maximize that quick first impression you get. Create a hook at the beginning of your video to capture someone’s attention and keep them watching. A slow burn, while sometimes great for movies or TV series, doesn’t really work in the Facebook newsfeed.
Additionally, try to incorporate your brand into that quick hook. That way, even if they do scroll on and forgo watching the rest of your video, you have a better chance to make an actual impact and expand your brand’s awareness. They may not take action right away, but if and when they’re ready to do business with someone in your industry, you’ll have a leg up as a brand they recognize and have heard of before. Even if it was only briefly.
2. Plan for your video to be played without sound
It’s widely cited that 85% of all videos on Facebook are watched without sound. That’s…almost all of them.
That means that although you should certainly still pay attention to the voiceover, dialogue, and music you’re using in your videos, it’s even more important to pay attention to the visuals and plan for no sound at all.
Be sure whatever you’re using in your videos has very clear, understandable visuals. Ideally, something with a good contrasting color to grab attention.
Additionally, it’s in your best interest to use captions with your videos wherever possible. That way, you stand a much better chance of conveying your message even without the sound included. You may even entice someone enough to turn the sound on and listen along as the video was intended.
Once your video is added to Facebook, you can click on the edit pencil next to the creative placements.
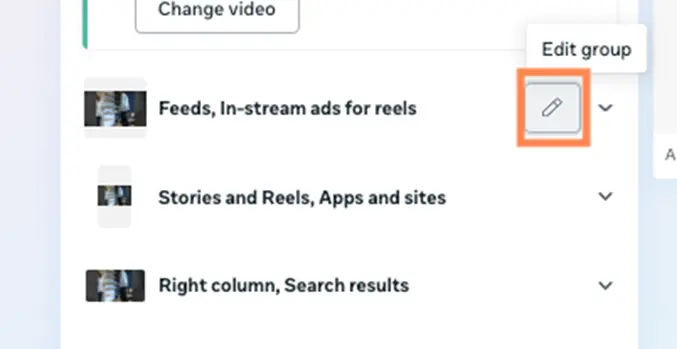
From there, you can click on captions in the left-hand menu and choose to leverage Facebook’s automated captions, then edit them in the interface, or you can upload your own SRT file of captions. Either option is great; it’s all based on your preference.
3. Don’t stress about studio-level video quality
While it’s definitely important to make sure your videos show your brand in a good light, that doesn’t mean they have to be movie studio quality. Many times, overly polished videos come off as insincere and inauthentic.
You’d be surprised how good a video can perform that was shot on the phone you’re likely reading this post on right now (or that is on your desk or in your pocket as you read on a computer).
Too often, companies I work with get so caught up in making something “perfect” that they lose sight of the main goal and end up not publishing anything. What we need videos for is to show off our brand, products, and services, and to make a connection with potential customers. That’s all. It’s simple and can be done even with sub-perfect creatives.
4. Know the safe zones in the video
When we built out the ad creatives earlier on, we discussed previewing ads to see how they looked with all video and text components combined.
One problem I often find is that the creatives were designed without remembering that Facebook will superimpose copy over your video. It’s the copy you provided as headlines and intro text, so it’s important, but it can muddy a video’s message if it’s covering something important.
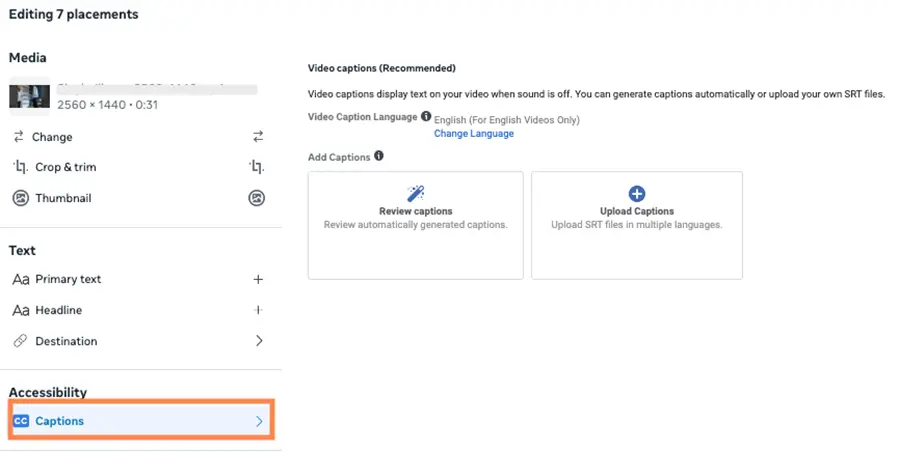
The image below shows what Facebook calls the “safe zone” in videos. This is the portion of the video that will never be covered in text.
Now, you don’t have to avoid putting anything in the “unsafe zone”, that’s still an integral part of your video. But you do need to make sure that any key visuals don’t get covered up. Think of a product image or someone’s face when they’re talking. Even shifting that visual to a slightly different portion of the screen can make a huge difference in your target audience’s retention of your message.
5. Leverage audiences based on video engagement
The videos you run in your ads are hosted on Facebook, and they can track how people are viewing and engaging with them (see the columns section above). Having that insight is great, but you know what’s even better?
Making audiences based on that engagement.
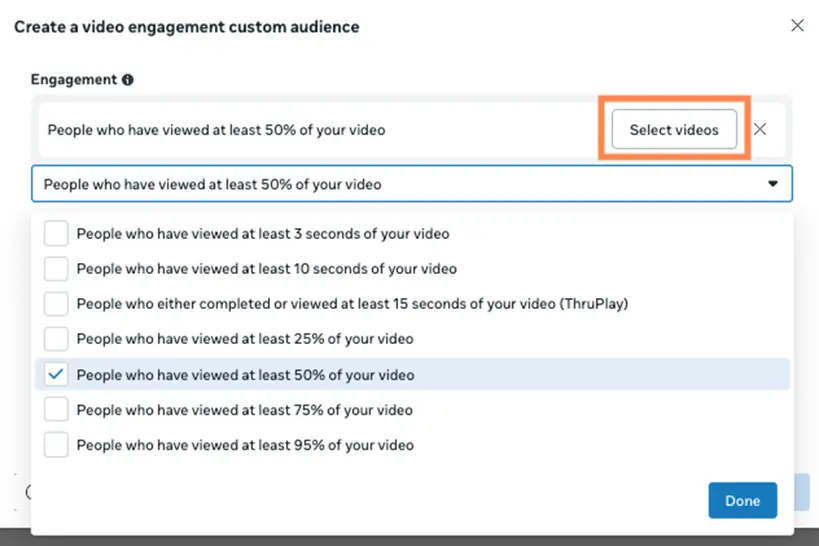
In the audiences manager, you can use video engagement as the source of an audience.
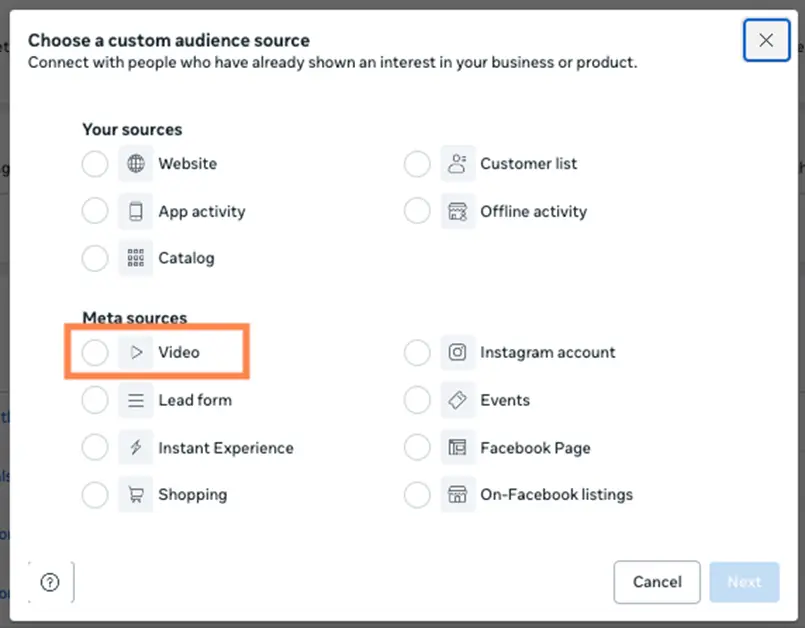
Then you can choose which videos and how much of them someone watched to make said audience. Those are then targetable in all Facebook Ads campaigns.
These are great for building a funnel where you use the initial video ad to make someone aware of your brand or interested in your product, then remarket to them later on to take a lower funnel step like visiting your website, filling out a lead gen form, or even making a purchase.
You developed your videos to speak to your audience for a reason. Don’t let that one and only video ad impression be your shot to create a lifelong customer.
Press “play” on a high-impact Meta video ad strategy
Video ads can be a very valuable tool for reaching your audience on the Facebook Ads platform. Hopefully, this rundown and set of best practices will help you make the most of your videos from first impression to conveying your message, then remarketing them with video engagement audiences. For more ways to take action on your business’s video ad strategy, see how our solutions can help!

Meet The Author
Michelle Morgan
Michelle is the Co-Founder of Paid Media Pros. She has twelve years of experience in all aspects of PPC and brings a wealth of experience developing and executing campaigns across search, social, and display platforms in both agency and in-house settings. Her experience gives her an especially well-rounded and holistic view of the paid search landscape—one she shares regularly as an influencer, author, and industry speaker at events like SMX, HeroConf, and Pubcon, as well as the Paid Media Pros YouTube channel.
Recommended for you