Managing a Google Ads account can be a lot of work, especially if you don’t have the dedicated time or team for it. Luckily there are some ways to help automate your accounts built right into the platform. One of my favorites is Google’s automated rules feature. Today, I’m going to run through setting up rules and give tips along the way to make yours as effective as possible.
Let’s get started!
The Basics of Automated Rules
Google Ads automation has become a bit of a touchy subject, but automated rules can be a very powerful way to semi-automate your Google Ads accounts. They’re pretty much exactly what they sound like: a set of rules with conditions automatically running and making changes in your accounts.
Automated rules are highly customizable and allow you to make scheduled changes on most aspects of an account. Here are all the places automated rules can apply:
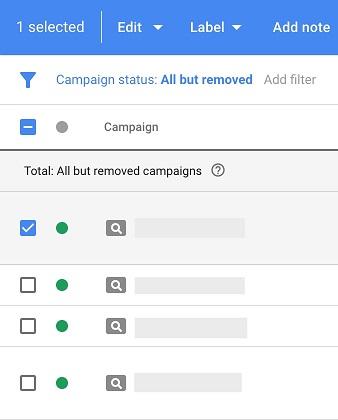
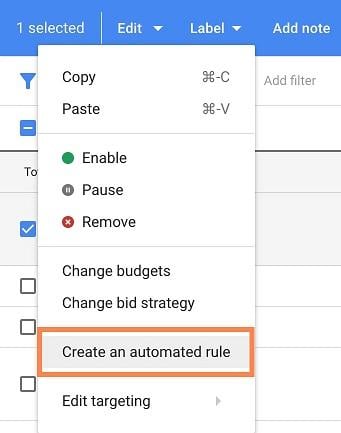
When you’re ready to create a new rule, there are a couple routes you can take to accomplish this. The first is to simply navigate to the campaign or account piece you want to automate in the interface. Check the blue box next to what you want to automate, click “Edit,” then choose “Create an automated rule.”
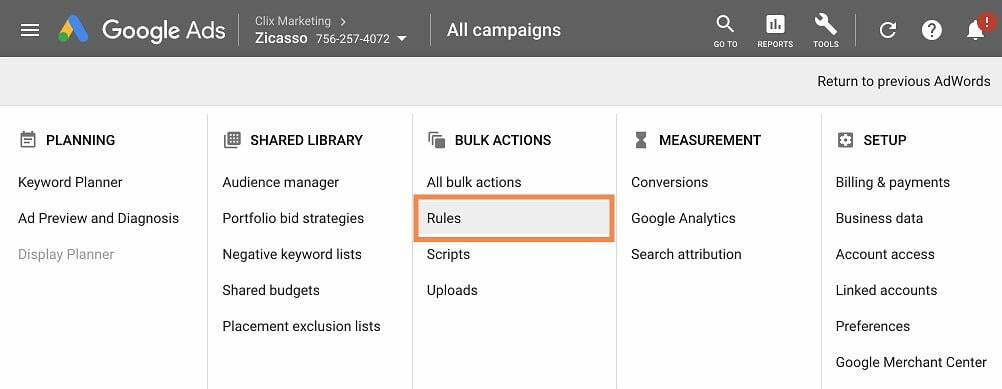
The second way is to use the top navigation under “Tools,” then choose “Rules” under the “Bulk Actions” section.
Once you’ve selected what you want to automate, you’ll then be prompted to select the type of rule you want to run. Depending on what aspect of the account you want to automate, there are a handful of different options, but they all typically boil down to the following:
- Pause
- Enable
- Send Email
- Change Bid/Budget
Each of these are relatively self-explanatory, so I won’t go into detail at this stage. The next portion of rule building is where you can get very customized for your needs.
Once you’ve chosen the type of rule you want to run, it’s time to set conditions. This is where the fun really happens.
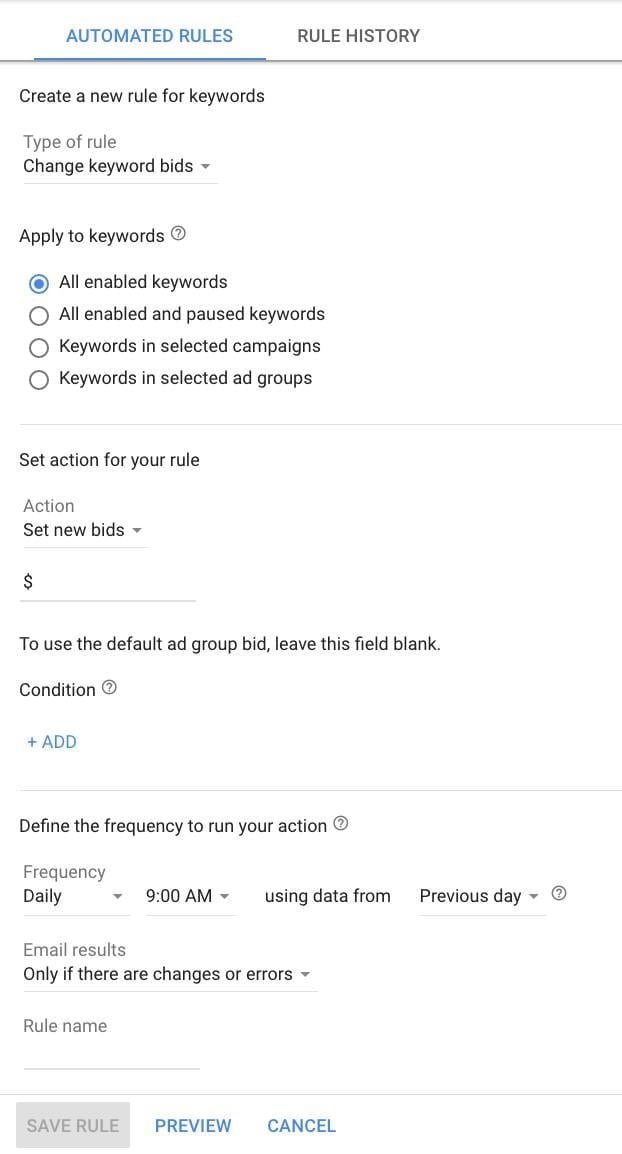
In the automated rule builder, you’ll see a screen that looks something like this depending on the route you chose:
I’m going to run through a slightly more intricate rule of changing keyword bids based on performance to give you an example to follow. Your rules can be as simple or as complex as you would like to make them, but I’m hoping a slightly more in-depth example is more useful than a simple one.
On this screen, you’ll see there are effectively 6 different sections of building a rule:
- Rule Type
- Apply to
- Set Action
- Conditions
- Date ranges
- Email results and Rule name
Since we’ve already addressed the Rule Type section, let’s jump into each of the remaining pieces of the editor screen to get a sense of how to set up automated rules.
Apply To:
In this section, we’ll be selecting what we want our automated rule to apply to. For this example, I’ll be choosing the keywords I want my rule to evaluate, but for other types of rules, you’ll be choosing the campaigns, ads, demographics, etc., that you want to automate.
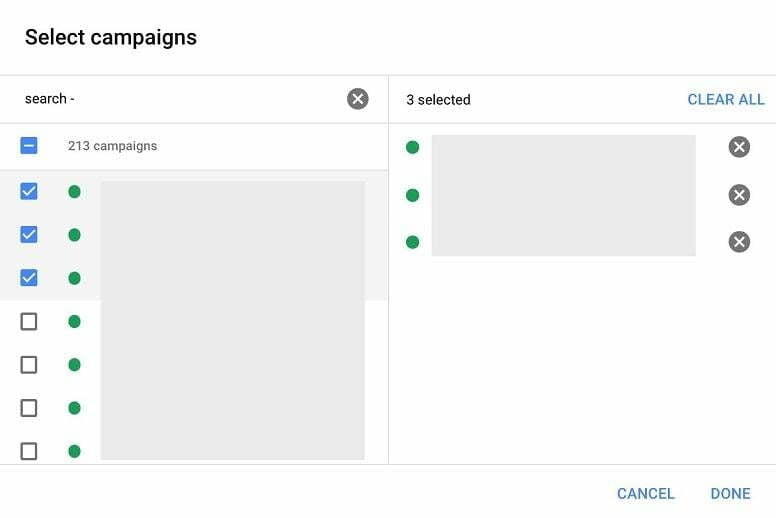
Let’s say for this rule, I only want to focus on keywords in a handful specific campaigns. I would choose the “Keywords in selected campaigns” option, then select the campaigns in the pop up:
Now that I’ve chosen my campaigns, this rule will apply to all keywords within those campaigns but it won’t make any adjustments to any other set of keywords in my account.
Set Action:
In this section, we’ll define what actions we want to make on the keywords. This will be dependent on the conditions we set in the following section.
For my keyword rule, I’m able to choose from a number of different actions:
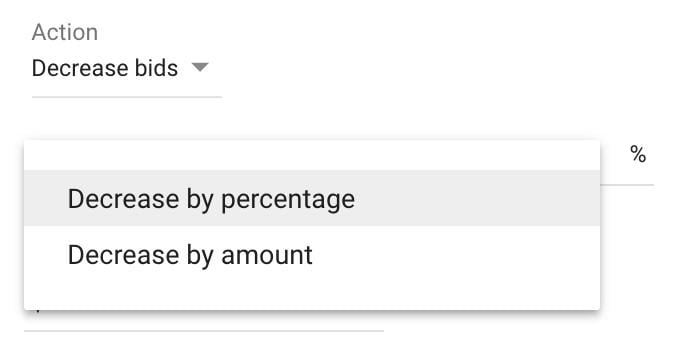
For this rule, I want to lower bids when my CPA gets too high, so I’m going to choose the “Decrease bids” option.
I’m then prompted to choose whether I want to lower my bid by a percentage or amount.
By percentage simply means my bid will lower X% each time the rule runs. If I lower by an amount, that means that my bid will lower only by the amount I set, like $0.25.
When automating multiple keywords, ads, campaigns, etc., with different levels of bids or budgets, it’s best to set percentage rules so the change will have equal impact on all campaigns. A keyword bid decrease of $0.25 might be a drop in the bucket to a keyword with a $20 bid. But for keywords with a $1.00 or even $0.50 bid, you’ve just cut the bids by 25% to 50%!
If you’re only setting 1-2 aspects of your account with more similar starting points, then an amount change will be a good option if that’s what you prefer.
Rule of thumb: when in doubt, use a percentage change.
Conditions:
In this section, we set the performance criteria we want to reach before the rule runs. Meaning, if I want to lower bids when my CPA is too high, I have to tell the system the amount a CPA has to exceed for it to become too high
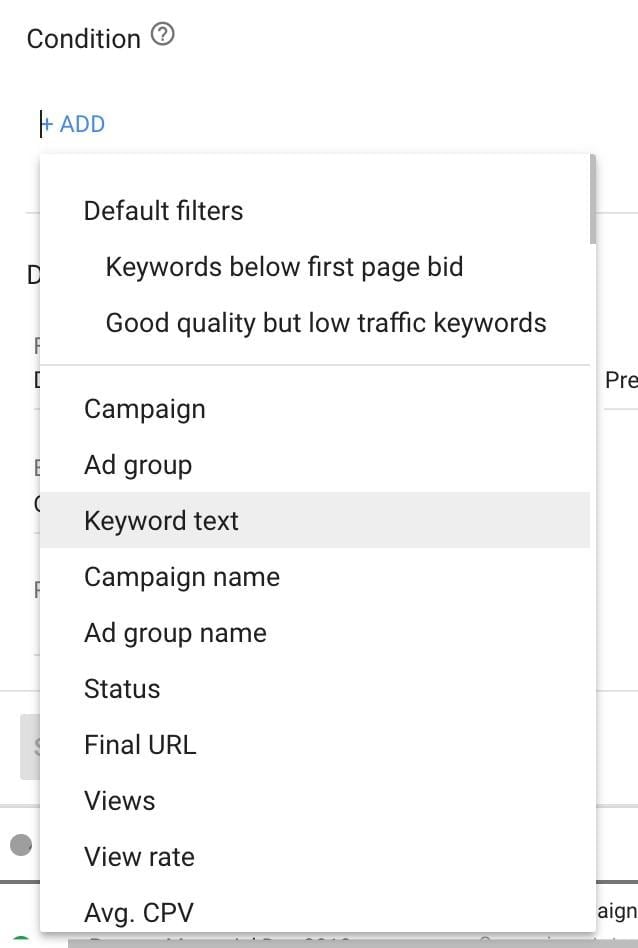
When you click the blue “+ADD” link in the conditions builder, you’ll be prompted with a list that looks like nearly every other filter in the account. This is where automated rules get their power. You can create highly customized conditions to be met for your rules to run.
For this example, I’m going to choose “Conversions” and “Cost/conv.” The conditions below mean that if I have more than one conversion and the CPA on that is over $100, then my rule will run to decrease my bids by the percentage I set in the previous section.
You can choose just about any criteria you want here.
One important thing to note is that you have the ability to set conditions based on keyword text, campaign name, and more.
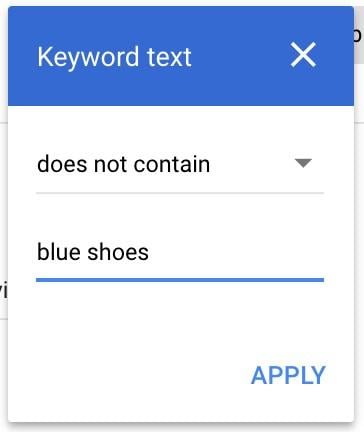
Ideally, you were able to be specific with choosing the right campaigns, keywords, etc. that you want to automate in the earlier section. But let’s say there are a couple of keywords I want to exclude from this rule in the campaigns I chose above. I can simply choose the “Keyword text” from the condition options, select “does not contain,” then enter the keyword phrases I want excluded from this rule.
Now this rule will apply to all keywords in the campaign except those that contain the text “blue shoes.”
Frequency:
The frequency section is pretty simple to set up, but it can be really important to pay attention to.
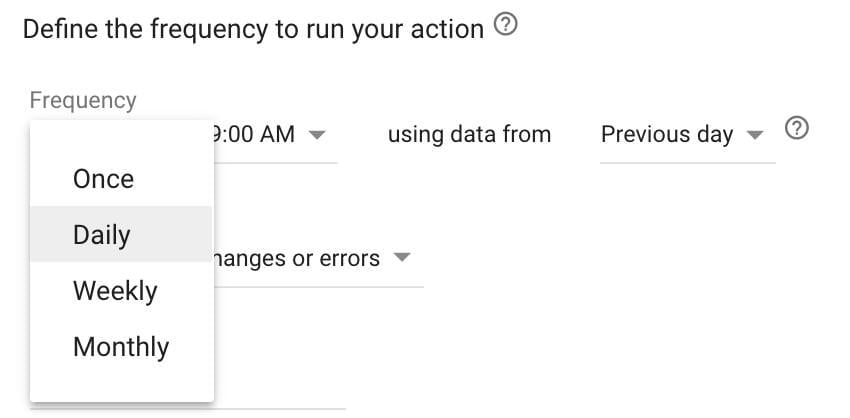
The first date option you choose is how frequently you want the rule to look for conditions to make your defined changes.
The “Once” setting means this rule will only ever run once. This is ideal for pausing/enabling campaigns around holidays or promotions. The other settings will set up a recurring rule.
For my rule, I want to set it to run weekly. This means the rule will scan my associated keywords for the conditions I set once a week and only make changes to the keywords that meet those conditions.
I can then choose the day of the week and hour of the day I want my rule to run.
The “using data from” option lets you choose which data you want to have the conditions reviewed for. The dropdown has a ton of options available.
Important Note on Date Ranges
It’s important to not double dip on data; you don’t want to optimize on the same set of data twice.
If I have my rule set to run each week, the longest data window I should set is the “Previous 7 Days” option. If I go further back than that, like say the “Previous 14 Days,” I’ll be optimizing on the same set of data twice: once when it was within the past 7 days and again when it was part of the past 14 days.
You should only optimize on a set of data once. Make your desired change, then analyze new performance to see if that optimization worked. If it did, great! If it didn’t, then you have more work to do. But the data from the first set of data you optimized should not be included in the second round of changes.
Email Rules:
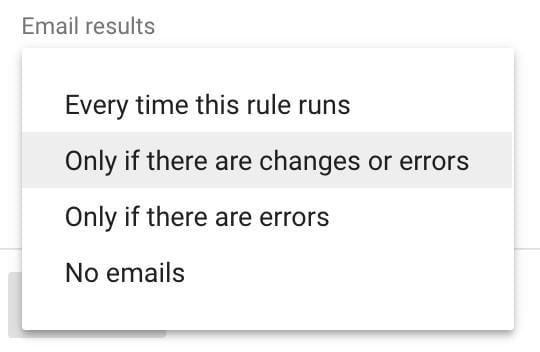
This section tells Google Ads how frequently you want to receive emails around this automated rule:
If you’re new to automated rules, I encourage you to opt for an email at least every time the rule runs with changes or errors. This will allow you to get a sense of the changes that are being made in the account based on your rules. Otherwise, setting the rule to run only when there are errors should be a good default setting.
If you’re using automated rules to call out problems in the account or to alert you of any performance fluctuations, using the email setting “Every time this rule runs” is the best option.
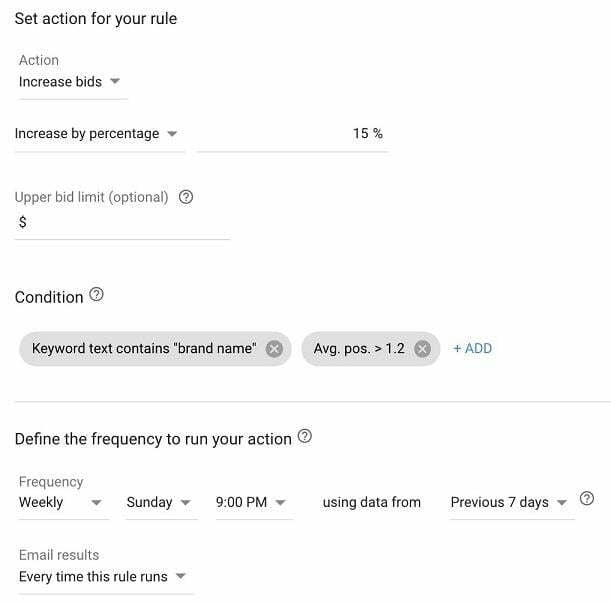
For example, if you want to make sure your brand keywords are always in average position 1.2 or higher, you might set a rule that looks like this:
You’ll then only be emailed when your brand keywords have fallen in average position and you can log into the account and take appropriate action.
Rule Name:
Naming your rules is the last thing you do before you set a rule live. This might seem like a small thing, but if you’ve managed an account for a long period of time – maybe a number of years or longer – it can be very helpful to make sure that you are keeping things well labeled and organized in case you need to do any type of retroactive reporting analysis.
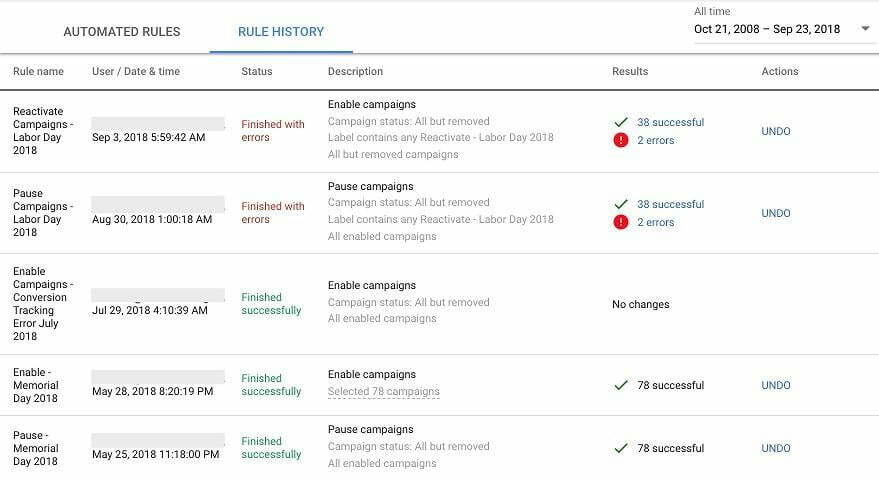
For example, if you want to pause your campaigns over Labor Day, it makes sense to not only name your rule “Pause Campaigns,” which is the preset that shows up, but also to include Labor Day and the year. You can go so far as to add the actual date of change and time if you like, but I’ve found that knowing the holiday weekend in the year is sufficient.
Being this specific with rule naming convention also allows you to make better use of the automated rules change history. In this report, you’re able to see what rules ran, what changes were made, and if any errors occurred.
Potential Automated Rules to Run
Now that we know how to set up automated rules, I want to give you a few examples of rules that might be a good fit in your accounts:
- Pausing/Enabling campaigns around a holiday or promotion
- Adjusting keyword bids based on CPA and conversion performance
- Increasing keyword bids to maintain high average position or impression share
- Increasing bid modifiers on an age group if CPA is 20% below your target
- Lowering budget on a display campaign if your CPC is higher than you would like
- Giving more budget to a YouTube campaign if the average view rate is over 50%
The sky is really the limit here. Think of these as simple if/then statements within your account.
3 Last Tips for Setting Up Your Automated Rules
Before you get started with your account, here are some best practices for automated rules that I have found important in my years of account management.
Don’t Automate Something You Haven’t Done Yourself
I think this is one of the most important things around automated rules: if you haven’t done it manually, don’t automate it. There are too many options for mistakes if you’ve never made a specific change before to let the computer take over.
Pausing and enabling campaigns after a holiday is pretty self-explanatory. Running through it manually will ensure you understand if there are caveats to the rule.
For bid or budget adjustments, however, this is crucial. I recommend doing manual bidding at the cadence you are thinking of setting a rule on for at least a month before setting the rule. This will allow you to test to see if the changes you’re making are what you want and if they’re having the desired effect. Maybe you started off thinking a 10% bid adjustment was a good idea, but over the course of that month it’s not having the impact you wanted or it’s doing too much of a good thing. You might even find that some keywords could use a 15% adjustment while others need 5%. You’ve now just found you need two rules instead of one.
Without this early time to learn and manually adjust campaigns, you might be missing out on making your automated rules as efficient as they should be.
Don’t Let Rules Run Unsupervised
Automated rules can be a great way to take some manual work off your plate, but they can’t and shouldn’t replace having a human reviewing the account. Regularly check in on the rules you have set. Are they functioning the way they should? Are they having the desired impact you had in mind when you set them up? Do things need to be adjusted?
Even if it’s once a month or once a quarter, regularly check back in on your automated rules to ensure you’re doing the job you need them to do.
Think of the Positives and Negatives
The example I gave above was to lower bids on keywords if CPA was too high. That’s a negative thing to minimize in an account.
But what about the positive?
Whenever I set up an automated rule, I always think if there’s a counter balance to the action I’m taking. Is there a rule I could run to increase bids on keywords with low CPAs? If I’m pausing campaigns, do I need to activate them in the future?
Balancing rules might not always be applicable, but I’ve found at least going through the thought exercise can help me better think through my strategy and make sure my rules are set up for success.
And there you have it! Automated rules can be a fantastic way to save time in your account, but they should be thought through before setting them up and certainly not let to run the account without you being involved.

