Intricate lighting. Tryptophan comas. Mother-in-laws.
Yup: the holiday season is finally underway. For most people that means truncated workweeks, a few extra layers for the daily commute (in our neck of the woods, at least), and those warm-fuzzy feelings incited by too much time spent among distant relatives. For ecommerce advertisers, however, the end of the year inevitably comes with a heaping side of unyielding stress.
Unless, of course, you’ve decided to alleviate the pre-yuletide neuroses associated with managing your Google search and shopping ads with product promotions.
Today, I’m going to show you how you can gain a distinct competitive advantage in Google Ads using one (or every) flavor of these powerful tools. For those unfamiliar, product promotions include:
- Merchant Center-only promotion extensions
- Implementing sale pricing within your shopping feed
- Pricing and promotion extensions (these are for search ads, but they’re particularly useful for ecommerce advertisers!)
For each, you’ll learn what each promotion is, when to use them, and, most importantly, how to implement them in your Google Ads account.
But first…
The (Rather Obvious) Case for Product Promotions
Holiday shoppers are a fickle bunch.
They’re picky. They’re price-conscious.
But if they can be counted on for one thing, it’s that they always do their homework. How else are they going to scope out those unmissable deals, huh?
Given that we live in an era in which phonelessness is closer to limblessness than a mere faux pas, it’s a given that this research is happening in the palms of your prospective customers’ hands, not as they serendipitously stroll past your storefront.
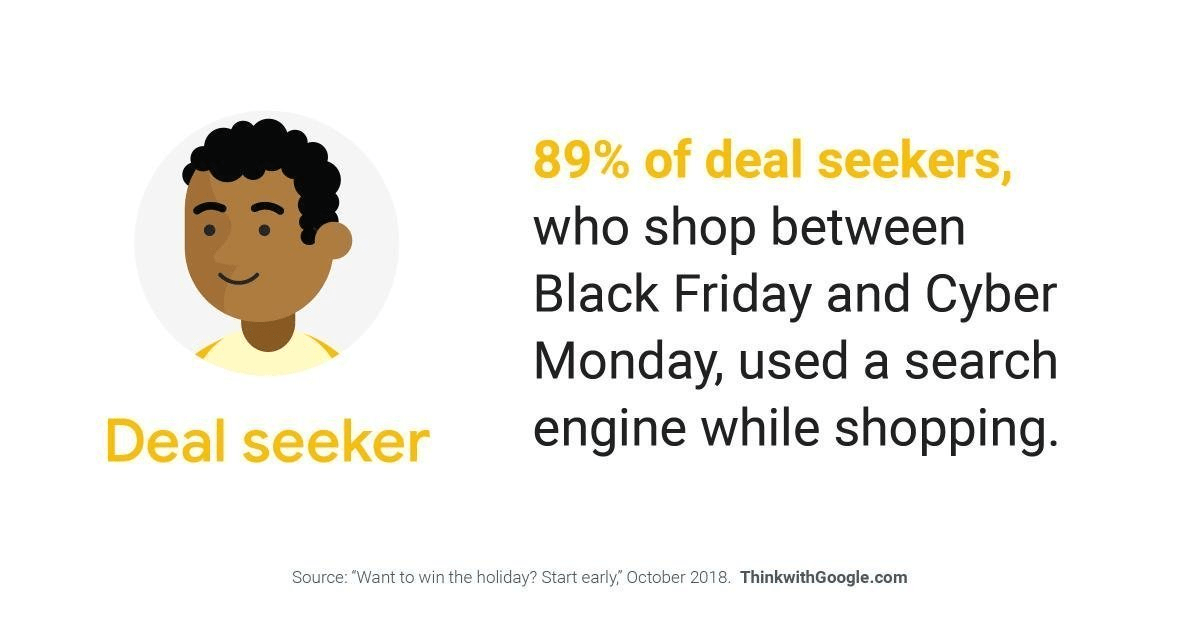
In fact, according to Google , 89% of deal seekers (holiday shoppers hungry for savings) use a search engine while shopping.
More impressive still is that the time they spend shopping on their phones is a stone’s throw from double that which is spent shopping in-stores.
With so much shopping time spent interacting with search engines, the opportunities for deal-hungry eyeballs on your (search and shopping) ads are aplenty. Seems prudent to signpost potential cost savings in as many ways as you can, right?
Ready to drive more traffic to your online store than ever before? Download our free guide to Google Shopping and start building profitable campaigns today!
Add Sale Pricing to Your Merchant Center Feed
Perhaps the most obvious way to notify your prospective ecommerce customers of a sale is to, uh, change your pricing to reflect said sale.
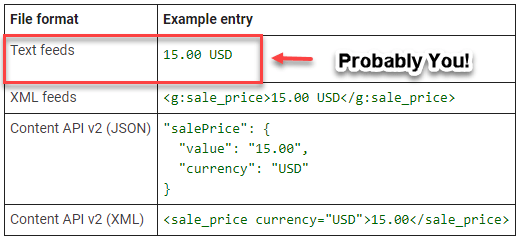
Google allows you to do this by adding the “sale_price” and “sale_price_effective_date” attributes to your shopping feed.
How does it work? Simple.
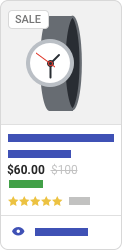
When the sale price effective date hits, your sale price will appear in your shopping ads as in place of your original price. But wait, there’s more! Sometimes, both the original price may and the sale price will show simultaneously (as is the case in the image below), showing your prospects just how exquisite your sale truly is.
This is called a sale price annotation, and it comes with a few stipulations. Your original price:
- Must have been charged for a period of at least 30 consecutive days in the past 180 days.
- Must be valid.
Additionally, your shiny new sale price:
- Must be lower than the base price.
- Must represent an offer greater than 5% and less than 90% of the original price.
Do these things, and your shopping ad will have some panache. The sale price will show as the current price alongside the original price, which will show with a strikethrough. Your ad will also show with a badge that highlights your sale. The specific colors used for annotations differ depending on where your ad appears.
Regardless of whether or not the annotation shows, there are, of course, some additional hoops to jump through (thanks, Google!) in order for a sale price to show at all:
- The initial price and the sale price must both be present on your landing page. The sale price does not have to be more prominent, but both prices do need to be clearly displayed.
- The sale price in your feed needs to match the sale price on your website. It also needs to be presented in a way that makes sense within the context of your target country’s currency (so, like, $511.918171773 aint gonna fly)
- This should go without saying, but the sale price you submit must be lower than your original price.
Finally, know this: if your sale will run in perpetuity, you don’t have to include the sale_price_effective_date field in your feed; Google will assume that the sale price should go into effect ASAP and it will run until you remove the field entirely.
Leverage Merchant Promotions
Merchant Promotions let you augment your shopping ads on Google with badges that convey potentially irresistible offers. They look neat. They give you a leg up on the competition: what’s not to love?!
In the olden days, when Motorola Razrs roamed free, ecommerce advertisers looking to leverage promotions in their shopping ads had to do so through the feed. And an application process. With the advent of Google Ads, however, it’s now easier than ever to sweeten the deal for online shoppers.
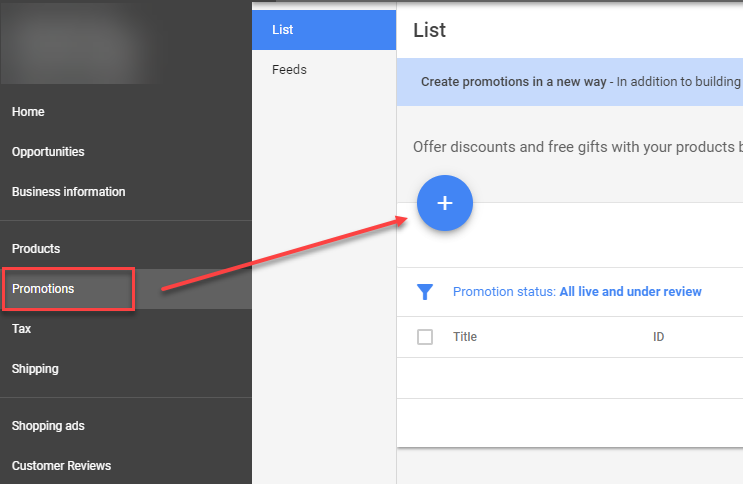
You can build promotions directly within Merchant Center, no feed-fiddling required.
First, sign into your Merchant Center account and navigate to the Promotions tab:
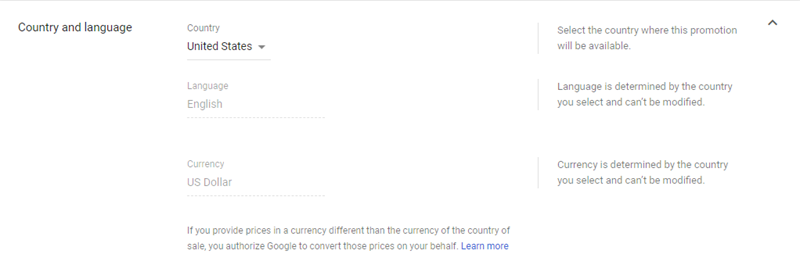
Next, you’ll be prompted to select the country and language you’d like your promotions to appear in:
Now, the fun part.
Merchant Promotions come in four different flavors, each of which has three variations of its own:
- Amount off: Offer a monetary discount
- Percent off: Offer a percentage-based discount
- Free gift: Offer a free gift (!!!)
- Free shipping: Offer free shipping
Let’s dig deeper into each option available to you…
Amount Off & Percent Off
These are grouped together because, well, they’re variations on a theme. Simple replace the word “amount” in the explanatory cards below with “percent” and, voila, you’ve got a percent off merchant promotion.
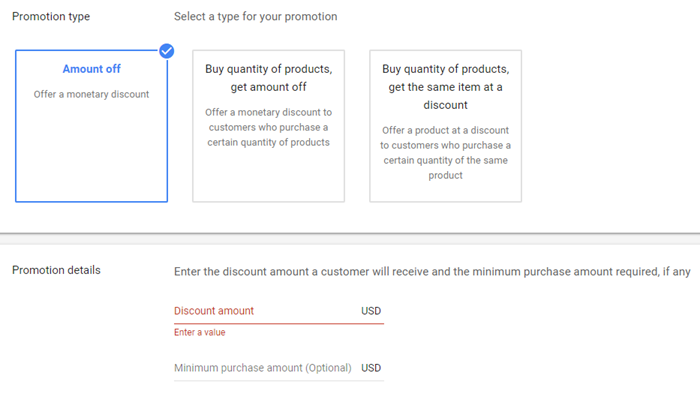
Let’s begin with straight-up “Amount/Percent off.” You are asked to choose your discount (as a dollar amount or a percentage, depending which you selected above); from there, you also have the option to assign a minimum purchase amount.
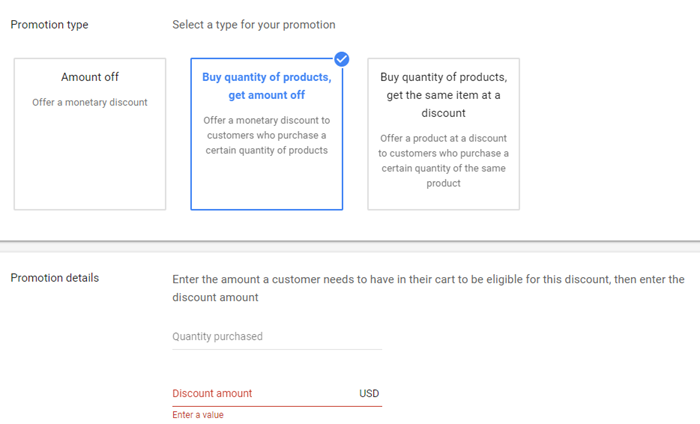
Next up we’ve got “buy quantity of products, get [amount/percent] off.” As the name implies, this Merchant Promotion allows you to offer a discount to customers who buy (at least) a specific number of products; if your ecommerce business is dependent of high-volume orders, this one’s for you.
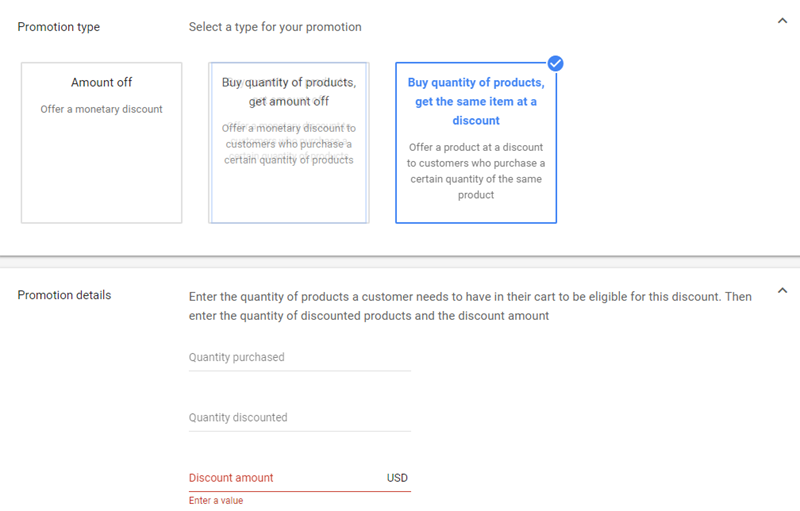
Finally, we come to “buy quantity of products, get the same item at a discount.” A bit confusing, right? Of the amount/percent off discount types, this is the most complex, if only because it has three variable fields. If you choose this option, you need to input the number of products a customer needs to have in their cart to be discount-eligible. From there, you need to enter the quantity of discounted products and the size of the discount you’re offering.
Phew.
Free Gift
For what it’s worth, the free gift Merchant Promotion is my personal favorite. A discount is nice, but FREE STUFF?!?! I can’t think of a better way to catch the eye of a holiday-season shopper on the hunt for a great deal and a free stocking-stuffer.
The first free gift option is simply “get a free gift.”
Simply describe the free gift that’ll wind up in the cart of someone who clicks you shopping ad once they purchase; you also have the ability to add a minimum purchase amount or quantity.
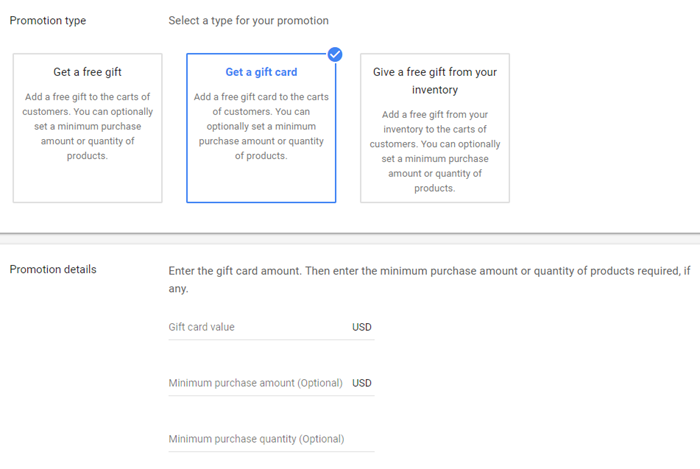
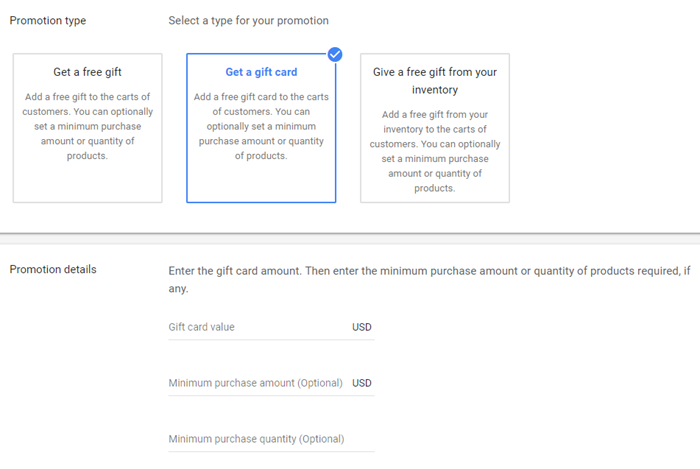
Next, you can implement an offer that adds a gift card to the cart of your new favorite customers. The only difference between this Merchant Promotion and “get a free gift” is that you have to assign a value to the gift card you’re giving away.
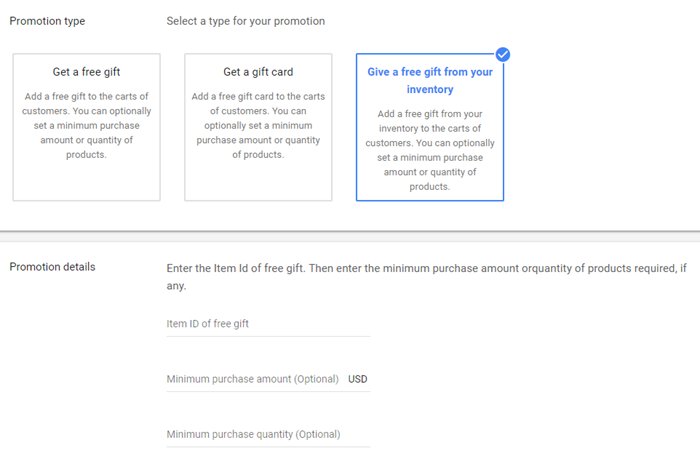
Finally, “give a free gift from your inventory” requires you to input the item ID of a product in your feed that you’d like to give away once a prospective customer hits a purchase threshold.
Free Shipping
Next, we come to ol’ faithful: free shipping.
While Amazon has created a world in which packages magically appear on your stoop two days after clicking “buy now” without forking over a penny for the privilege, smaller ecommerce businesses who can afford to cover the cost of shipping gain a distinct advantage against comparable competition.
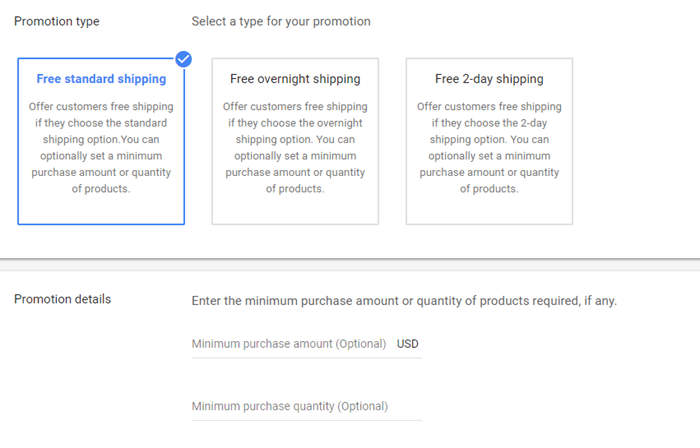
There are three different free shipping offers available within the Merchant Center interface:
- Free standard shipping
- Free overnight shipping
- Free 2-day shipping
For each option, you have the option to assign a minimum purchase amount or quantity; neither is necessary if you’re feeling particularly giving this holiday season.
***
That’s it for holiday tips implemented in Merchant Center; now let’s take a look at the two most effective ad extensions for your Google Ads search campaigns!
Implement Price Extensions
Price extensions help your search ads stand out on the SERP by adding information-rich to your copy. Each price extension gives you the ability to link to a specific product page, ensuring that searchers can navigate directly to your hottest holiday deals with limited friction.
They allow you to:
- Highlight your offerings more effectively
- Provide links directly to your offers, decreasing friction between click and conversion
- Skip crafting new ads to reflect holiday pricing changes
When they first hit the scene, price extensions were only available on mobile devices. Since then, however, price extensions have been rolled out across all devices, making them an invaluable tool for ecommerce advertisers.
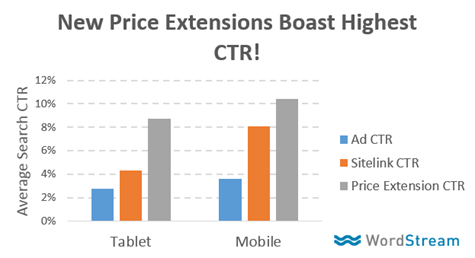
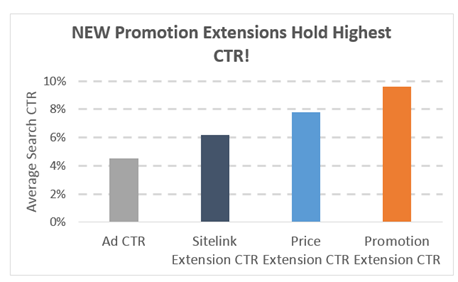
We’ve done extensive testing with price extensions here at WordStream and one thing’s clear to us: they’re powerful. In fact, we’ve seen them 4x CTRs when compared to run-of-the-mill text ads.
Let’s take a closer look at how to implement them in your account.
RELATED: 8 Perilous PPC Mistakes to Avoid During the Holidays
Setting up Price Extensions
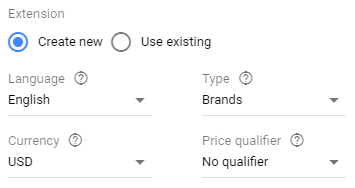
You will be asked to identify a language, type, currency, and price qualifier for each price extension you wish to create.
Languages are limited to:
- Dutch
- English
- French
- German
- Italian
- Japanese
- Polish
- Portuguese (Brazil)
- Portuguese (Portugal)
- Russian
- Spanish (Latin America)
- Spanish (Spain)
- Swedish
Note that the language of your price qualifier (more on that in a moment) may change if Google detects that a searcher is using a different language than you have indicated here.
“Type” refers to the kind of price extension you’re creating. Available types include:
- Brands
- Events
- Locations
- Neighborhoods
- Product Categories
- Product Tiers
- Products
- Service Categories
- Service Tiers
- Services
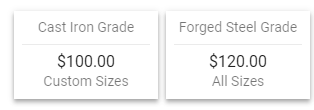
This is used in the sample ad (to the right of the extension creation UI) to provide you with an example of what a given category might look like. For example, selecting “Product Tiers” will change the example headers to the following:
Finally, you will be asked to identify currency (there are a whole mess to choose from so I won’t list them all here) and a price qualifier, which allows you to select either “from,” “up to,” “average,” or nothing in order to more effectively highlight price.
Once you’ve completed the high-level categorization, it’s time to create the individual items.
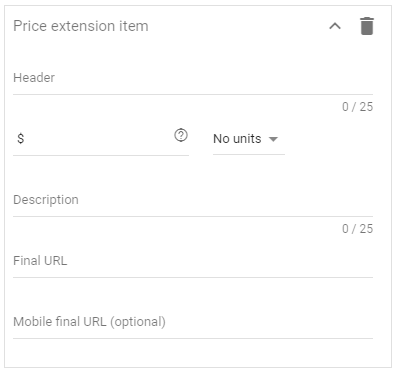
Each item you’d like to create a price extension for must include the following:
- Header: 25-character limit; this should be the name of the product or service you’re highlighting with a price extension.
- Description: 25-character limit; as is the case with callout extensions, you’re going to want to attempt to stay closer to 15 characters than 25, because this will ensure that your description isn’t truncated.
- Price: Self-explanatory.
- Unit: Language that relates to your product or service and compliments your price qualifier. Choose from: Hour, day, week, month, year, night, or N/A.
- Final URL: Last but not least, add a link to a relevant landing page.
Note that, for these gems to show, you must have at least 3 items listed (and Google recommends listing more than 5).
Implement Promotion Extensions
Google Ads promotion extensions give you the opportunity to highlight sales (particularly those that occur during the holiday season) without forcing you to write fresh ad copy. They’re the best friend of the busy ecommerce advertiser looking to stand out from the competition.
In fact, ads using promotion extensions had CTRs that more than doubled those of text ads served without any extensions:
Promotion extensions show a price tag icon beneath your ad and highlight a sale you’re running on your website. Additionally, you can specify details around your promotion, such as whether it requires any promo code at checkout and when the sales ends.
As you can imagine after reading that description, promotion extensions have a lot of moving parts, which can make them seem a bit intimidating.
The components include:
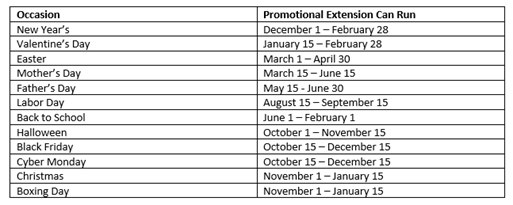
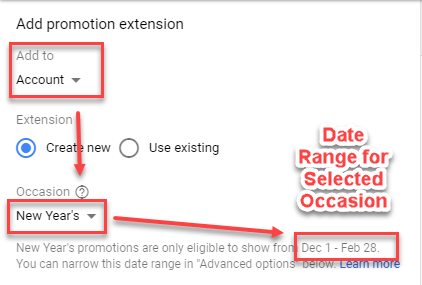
- Occasion: An optional field you can use if your promotion aligns with a holiday (and in our case, it certainly does). Each occasion is eligible to show during select dates (which can be narrowed further in the advanced settings).
- Promotion Type: Choose between monetary or percent discounts.
- Item: Product or service you’re promoting (20-character limit).
- Currency: Self-explanatory.
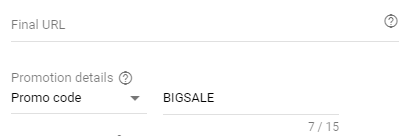
- Promotion Requirement: Choose between “none,” “on orders over,” or “promo code.” Note that, if you select promo code, you will be allotted an additional 15 characters to add one.
- Promotion Dates: Dates during which your promo is eligible to run as an extension. If you don’t identify dates but select an occasion, Google will run your promotion extension for the duration of the allotted window.
Here are the are the available occasions and the dates through which associated promotion extensions are eligible to run:
It’s also worth noting that, like price extensions, promotion extensions are clickable.
Setting up Promotion Extensions
First, decide the level at which you’d like to implement your promotion extension (account, campaign, or ad group) and if it aligns with one of the occasions listed above:
Next, choose your language and the type of promotion you’re running (percent discount, monetary discount). If you select a monetary discount, you’ll also be prompted to identify your currency. Now, name the product or service you’re promoting in 20 characters or less.
Next, add the final URL you want your promotion extension to bring prospects to and, if you’re using a promo code (people love promo codes) or would like to add an “on orders up to” caveat, do so here.
And you’ll end up with something that looks like this:
Who wouldn’t click that?!
Promote Your Way to Ecommerce Success this Holiday Season
Well, there you have it.
You’ve learned how to implement promotions across your search and shopping ads in order to capture the attention of high-intent prospects and move more units. Roll them out today, and you might even be able to take some time off this holiday season.

